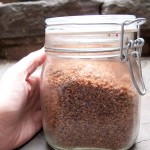
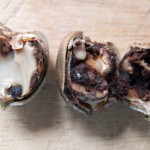
What to do with a million apples

After about a week of non-stop apple eating, I decided that I would have to be more creative to use up all the apples we had picked. I cut up about a dozen apples, dropped them in lemon water and packed them off with Lindsay for her class snack. I still had a mountain left.

We went over to a friend’s house for dinner, so I decided to bake an apple pie.

I used the recipe from The New Best Recipe cookbook. The crust was amazing, but I thought the pie itself could have used more pizzazz. Next time I will add a lot more lemon zest.

There was still a mountain of apples…

How to make acorn flour

When you are interested in foraging, you really have to pay attention to the seasons. If you read about ramps in the winter, you are going to have to wait until spring to find them. Shopping at grocery stores seems to have made us forget that certain things grow at certain times of year. At least locally, that is. I had read about making acorn flour a while ago, but it wasn’t acorn season. I forgot all about it until I saw Stephanie mention it in her blog. I was going up to the Berkshires for the weekend and it was the right time of year for acorns.

We went on a hike and I brought a backpack along to gather nuts. I had no idea how many I would need, so I summoned my inner squirrel and kept gathering and filling my bag. When we got home, I weighed the nuts I had found and had 8lbs. After pulling off the tops and discarding the ones that had worm holes in them I had 6lbs. I read in a couple of places that you place the acorns in water and the ones that float aren’t viable. I tried that and almost all of mine floated. I decided to check inside and see what they looked like. Some were bad, but most were good, so I decided to skip that theory.

Now comes the gross part…grubs! Many of the acorns had grubs. The fat, white, wiggly things totally grossed me out, so I decided to bake the acorns at 170 degrees F to kill them. A dead grub is still gross, but a wiggling one is much worse.

After discarding the acorns that were discolored or had grubs in them I think I was down to about 2-3 lbs. Acorns are full of tannins, so you have to soak them for several days to remove the bitterness. I tried soaking them when they were chopped, but thought that the water wasn’t getting to the inside of the acorn meat. I ran them through a meat grinder to chop them smaller.

Directions for how to make acorn flour:

  • Gather a ridiculous amount of acorns
  • Discard any that have obvious problems (squirrel bites or worm holes)
  • Bake acorns at 170F for 1 hour to kill grubs
  • Shell acorns tossing out any that are discolored or have grubs. It is pretty obvious which ones are good and which ones aren’t
  • Grind acorns in a food processor, or a meat grinder
  • Wrap in several layers of cheesecloth and soak in water. You will need to do this for several days, until the meat isn’t bitter.
  • Lay the acorn flour on a pan and either dry in the sun, or in the oven on the lowest setting. Make sure it’s completely dry or it will mold.

I will post some recipes within the next few days.

How to make kombucha

Kombucha scoby

A few weeks back I took a fermentation workshop with Sandor Katz. One of the many foods and beverages he covers in his book Wild Fermentation is kombucha. Kombucha is a fermented beverage made from sweetened tea. What gets the fermentation action going is a gelatinous clump of bacteria and yeast called the scoby, the mother, or the tea beast (love that one!) It’s a rubbery disk that is pretty unappetizing looking.

I was lucky enough to get a scoby from a generous person at the workshop, who brought extras. You see, when you make kombucha, you use a starter scoby, but then a new one forms. So then you have two, so you can then get two jars of kombucha brewing. But then you have 4 scobies. You can see how this can get out of hand quickly. In fact, if anyone lives near downtown Brooklyn and wants to try their hand at making kombucha, I can pass along a scoby to get them started. Just email me!
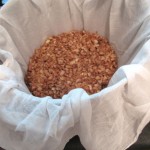
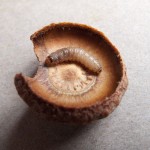
Fabric lid

Kombucha Recipe adapted from Wild Fermentation. To make 2 quarts.

Ingredients:

2 quarts of water

1/4 c. sugar

4 teabags of black tea

1 c. mature kombucha (you can buy it at most health food stores) This is like sourdough starter for kombucha.

kombucha scoby

Add sugar to the jar and boil water. When water has reached a boil, pour it into the jar (in this case a 2-quart jar) just to the point of where it starts to taper in. Stir to dissolve the sugar.

Add the teabags and let steep at least 15 minutes. Allow the liquid to cool to body/room temperature.

Add the mature kombucha and then the scoby. Put the scoby in opaque side up. Cover with a cloth which allows air circulation but keeps flies out. I take the metal disk out of the 2-part mason jar lid and put the screw ring on over a piece of fabric.

After a few days, taste the liquid (I pull some out with a straw. You know the trick where you dip the straw in and then put your finger on the end and pull up the liquid in the straw…). This part is really subjective. Kombucha ferments faster in warm weather, so keep that in mind. It’s been crazy hot here and I’ve still let my kombucha ferment on the counter for a couple of weeks. The longer it ferments, the more of a tangy, sour flavor it will have. If you let it go too far it will turn into vinegar. When it is to your liking, remove the scoby and store the kombucha in the fridge. If you like to flavor your kombucha, this is the time. I added lemon juice, some chopped ginger and some raspberry purée I happened to have on hand. I was emulating the trilogy mix by Synergy. I fill Synergy bottles, which are 16oz with my finished brew. To this I added juice from 1/4 lemon, a few slices or chunks of peeled ginger and about 1 t. raspberry puree. I have some in the fridge now with a few blueberries floating in the bottles.

When I pour the kombucha into my drinking glass, I always strain it to remove the ginger and any slimy bits (I know. Real appetizing. Makes you really want to run out and make some when I mention slimy bits) . It’s a little effervescent and very refreshing. And much to my dismay, kombucha is very trendy right now.

And if you don’t have any takers for the scoby, you can compost it, bury it with fruit trees or give it to your chickens. Mine wolfed it right down.

UPDATE: After several months of brewing kombucha, I’ve decided to take a break. I don’t have any more scobys to pass along. There are sites that explain how to grow a scoby from commercial kombucha. Here’s one.

Wild Fermentation

Last night I went to a lecture on making fermented foods. Sandor Katz was the speaker and the evening was organized by Just Food. Sandor was a funny, intelligent and very knowledgeable man. He has been experimenting with different methods of fermenting food for about 10 years. Wild Fermentation is his book, which looks to be an interesting read.

There were samples of fermented foods to sample: sauerkraut, carrot/ginger kraut (for lack of a better term), cheese and kefir. He demonstrated how easy it is to make sauerkraut while sharing his knowledge and wit with the audience. I learned a lot about making kombucha, which I think I will try soon. To make kombucha and kimchi, you need a bit of “starter”. In the case of kefir, it is called kefir grains. In the case of kombucha, it is called the mother, the mushroom or scoby. The scoby looks like a thick, gelatinous pancake. Several people in the audience very generously brought kefir grains and a scoby. The scoby grows in layers, so you can peel off a layer and start brewing your own kombucha.

There are a lot of health benefits from fermented foods: greater digestibility, higher amounts of nutrients, etc.

Be prepared to see some posts on fermented foods coming up soon!

Homemade Mushroom Ravioli

For Mother’s Day, Neil and Lindsay got me a ravioli attachment for my kitchenaid mixer. I have had fun making pasta and even made ravioli once. I’ve been eyeing the ravioli maker because it makes such beautiful, perfect little ravioli. I also thought it might take some time off the process.

So that evening we made wild mushroom ravioli. Neil bought a package of mixed wild mushrooms and some organic ricotta. I made the dough. The recipe is based on the recipe in The Complete Book of Pasta and Noodles.

  • 2T good olive oil
  • 2 cloves of garlic,  minced
  • 10 ounces of mixed wild mushrooms. You can see the ones we used, but feel free to use your favorites. Remove tough stems and mince.
  • 1 oz. dried porcini mushrooms, rehydrated in hot water and strained, then minced
  • 1/4 c. minced parsley
  • 1 c. ricotta cheese
  • 1/3 c. grated parmesan cheese
  • 1 large egg yolk
  • salt and pepper to taste

In a medium pan, sauté garlic until golden. Add mushrooms and cook until wilted (appx. 4 minutes). Add in the porcini, parsley and seasonings. Cook until the liquid has evaporated. Place mixture in a bowl and let cool slightly. Stir in remaining ingredients. This can be done the night before.

The pasta is a basic egg pasta, which is made with 2 cups of flour and 3 large (beaten) eggs. You mix the ingredients together. I used my stand mixer, but you can do it in a food processor. Add tiny amounts of water (1 T)  until the dough forms a rough ball. Let the dough rest about 30 minutes. Roll the dough out and fill with the mushroom mixture. Cook the ravioli for 4-5 minutes, or until al dente.

I made a sauce out of sautéd garlic w/ olive oil and then a can of crushed tomatoes. Grate a nice parmesan cheese over the top and you are done. We had fun figuring out the ravioli maker. Lindsay liked playing with and eating the raw dough strips that formed between the ravioli squares.

First and last harvest

One of the signs that summer is ending and fall has taken over, is when we have to cut down our basil. Neil always makes a huge batch of pesto that we freeze and enjoy all winter. On Sunday, we had friends over and made a batch of pesto pasta, from some of the last of the pesto. I also harvested the first greens in my garden for a salad. I planted the mache lettuce in the fall and covered the planters with a plastic tarp. There they sat all winter under snow and in the cold. It is amazing to me that anything could grow at all. But grow they did and the salad was delicious. I adore mache greens and have taken to growing them because they are so difficult to find in the store. I have found them at Trader Joes in my neighborhood.

Mache salad with pear and walnuts

Toast about 1/3 c. walnuts. Peel and thinly slice a bosc pear. Thinly slice a shallot. Use a vegetable peeler and shave about 1/3c. parmesan cheese. Add everything to the salad.

Dressing: Mix 1T dijon mustard with 2T sherry vinegar and 1/4c. olive oil. I put them into an empty jam jar and shake it until it emulsifies.

Linzer Torte and my dad

Of the many things my father loved to do, bake and listen to Mozart ranked very high. Whenever he had friends or family over to the house he loved to bake a special treat for them. He had an endless supply of  Hungarian recipes that he would try. His success rate was about 70% and when the desserts were good, they were really wonderful. The 30% failure rate usually had to do with his not thinking he had to follow a baking recipe to the letter. “Why should I put salt in something that’s sweet” was something he firmly believed. I am still scared to glaze a dessert with egg whites. My sister will immediately know why. My father must not have beaten his egg whites enough and one time his linzer torte came out with the equivalent of an egg white omelet on top of it. We had to scrape the omelet off the top and eat it because it was a crime to waste food in our house.

My father got better and better with his baking and all of his friends loved to share his creations. My father particularly loved to bake with my sister and me. It was a nice time that we could spend together.

One year ago friday my father passed away. I was thinking of a way to spend the day remembering him. I decided to listen to Mozart and make a linzer torte. Linzer was one of his favorite recipes and he seemed to have a different recipe every time he made it.

Linzer Torte Recipe

3 1/2 c. flour

1/2 c. sugar

1 generous T. baking powder

2 sticks of softened butter

1 egg yolk

1/4 c. sour cream (I felt like a bad Hungarian girl because I didn’t have any sour cream in the fridge)

1 grated lemon peel

juice from 1 lemon

jar of thick jam (raspberry, apricot or red currant)

1 1/2 c. finely chopped walnuts

1 egg white (please beat this well, or you will end up with the dreaded omelet on top)

Combine dry ingredients. Add butter. Combine and make a well in center.

Mix together the wet ingredients (except the egg white) and add to the flour mixture. Divide dough in 1/2. Press 1/2 the dough into the bottom of a 10×15 baking pan. Refrigerate both halves for an hour or overnight if desired.

Spread the jam onto the dough in the pan, making sure you don’t go all the way to the edge. It will burn if you do. I try and get as close as possible, because it can be a little bit dry otherwise.

Sprinkle the nuts over the jam.

Roll the remaining dough into ropes about 1/2″ in diameter. Think back to your preschool days when you would make snakes out of playdoh and you’ll get the idea.

I was running out of time and the dough wasn’t cooperating, so I rolled it out with a rolling pin and just cut strips. It worked really well, but next time I would try and roll the strip to make it a little rounder and more attractive. I also didn’t have time to make a nice woven lattice, but that would have been much prettier.

Once you have the top done, brush the egg white on top to make a nice glaze. Or you can skip this step if I’ve scared you.

Bake at 350F for 30-35 minutes or until the crust has a golden brown color.

Slumber Party Mania

Bed Cake

For my daughter’s 6th birthday party, we decided to host 10 girls at our house to a pretend slumber party. In the past we have rented a space to host the party, which has always been very expensive. I can’t believe my type-A personality didn’t realize having a winter baby would make outdoor (free space) birthday parties impossible!! Our apartment is a nice size, but certainly doesn’t have an extra room like a rumpus room that a house might have. We knew that  having the party here would be intense, so we decided to embrace that.

Neil made a huge blanket fort that took up most of our living room. It had two “rooms” and Lindsay decorated the back part. It looked a little like Jeannie’s bottle from I dream of Jeannie. Neil also set up a video camera to our tv, so the kids could dance to the music and see themselves on tv. Our friend Courtenay came and helped us make cootie catchers and paint fingernails. We played Light As a Feather, Stiff As a Board, which was new to all of the kids. In case you didn’t play that as a kid, here’s how it works. One kid lays on her back and keeps her body stiff. All the other kids kneel around her. They place two fingers from each hand under the stiff kid. Then they all lift their hands up at the same time (we chanted Light As a Feather, Stiff As a Board in a spooky voice) and lift the kid in the air. You wouldn’t think it would work, but it does. And nobody got dropped. They even picked me up.

I think the girls had a great time and loved the cake. I made that crazy cake using marshmallow fondant. The girl on the left is Lindsay and the others vaguely look like some of her friends. The cake was a chocolate buttermilk cake that I got from Epicurious and have made in the past.

Neil and I were pretty much exhausted for the rest of the weekend, but Lindsay and all her friends had a blast.

How to Make Hungarian Crackers (Pogacsa)

goodpuff1

This is a recipe that my father used to make for cocktail parties and was usually one of the first things to disappear. My sister and I seem to often be on the same wavelength and just as I was deciding on making these for Neil’s birthday party, she emailed me to ask for the recipe. She confirmed that hers disappeared immediately, so I thought I would post the recipe with directions on how to make them.

The first batch I rolled out to about 1/4″ thickness, which was *way* too thick. You can see from the photos below that they kind of shrink up sideways and puff upwards. The first batch were freakishly high, so I rolled the subsequent batches thinner (and poked them with fork tines).

Pogacsa (sometimes seen as Pogatcha)

Equal weights of:

flour

butter

cream cheese or feta cheese. I used feta cheese for these. I used 8oz (1/2 lb) measures of each and got a nice sized basket of crackers. Several dozen.

I love Hungarian recipes! They are usually quite simple. Okay, so I mixed the butter and cheese together until it was well-blended. Then I added the flour and mixed it with the dough-hook on my stand mixer. The dough is very thick. You can see the bits of feta in my dough.

Generously flour a surface and roll the dough out as seen below. You will fold each edge to the center until you have 4 flaps folded in. Repeat this several times and keep it well-floured. The rolling part is very important, otherwise the crackers won’t puff.

Wrap in plastic and let rest in the fridge for about 1/2 hour.

Roll out thinner than 1/4″ (I have photos of the overly puffy crackers. Don’t let this happen to you!) and cut with a small drinking glass or other cutter. I used a canapé cutter, which I think was too small. So about 1 1/2-2″ across. I also suggest poking them with the tines of a fork to keep the puff factor down.

Bake at 350 degrees F for 15-20 minutes until they are golden brown. You can put them directly on the cookie sheet. There’s enough butter in these that they won’t stick to anything!

They are best warm, but are still delicious room temp. If you have any left over you can always warm them up and have with lunch. I only had extras because I had an insane amount of food at the party where I served them.

Spinach Pasta

spinach pasta

I had a bunch of spinach in the fridge that was looking a bit limp, so I decided to make some fresh pasta. I have a pasta roller/cutter attachment for my stand mixer, but you could use manual rollers.

Fresh Spinach Pasta

1 bunch of spinach steamed, or 1 package of frozen spinach thawed. Either way, chop up the spinach finely. I tried using a food mill, which wasn’t a huge success. A blender or food processor or determined knife wielder would work great.

3 eggs

2 1/2 cups of flour

I mixed the three ingredients together and added some of the spinach liquid to make the dough form a ball. I kneaded it by machine for 2 minutes and then by hand for another 1 minute. Let the dough rest for about 15 minutes.

Roll it and cut it. Divide the dough in 4 equal parts. Flatten one piece and feed it through the widest opening on the pasta roller and then fold in half and feed through again. Repeat this several times until the dough is nice and supple. I dust it with flour so it isn’t sticky at all. This helps prevent the pasta from sticking together when you cut it. I put each piece of dough through this and then set the roller to a thinner setting. I made fettucini, so I ended up on setting 5 of my kitchen aid roller. It’s a medium setting, which gives it a nice heft when you are eating it. You don’t have to fold the dough in half for the thinner settings – that’s just on the first setting.

I’m going to get some crushed tomatoes and make a simple tomato and garlic sauce. With a little grated parmesan it should be simple and pretty. Ever notice that Italian food and the Italian flag are the same colors? Coincidence? Nah.