How to Pickle Green Cherry Tomatoes

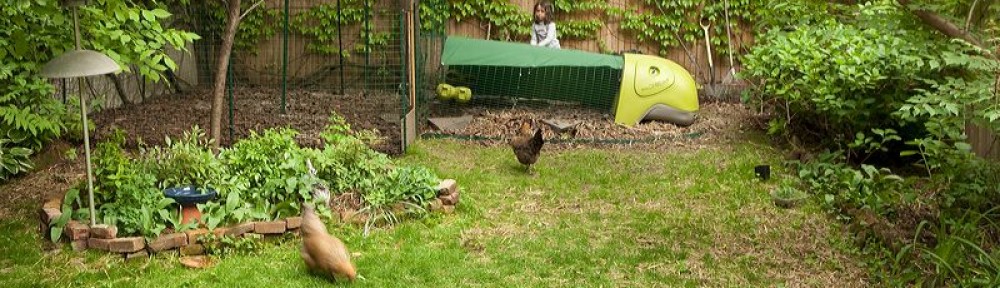
Just a couple of weeks ago I was commenting on how unseasonably warm it was. Since then we’ve gotten colder with most nights below freezing and the ground feels hard under my feet. Neil wrapped the chicken’s run with plastic to protect them from the cold wind and they are spending a lot of time in their little hoop house instead of the larger (un-wrapped) enclosure.

I had many green cherry tomatoes left on the vine, which I didn’t want to go to waste. I did some searching online and found a few pickle recipes. I decided to make a recipe that didn’t use water-bath canning techniques, which just means that I need to eat them up sooner.

green tomatoes

green tomatoes2

green tomatoes3

Adapted from John Kessler’s Pickled Green Cherry Tomatoes (or tomolives)

1 quart green cherry tomatoes or quartered large green tomatoes

1/2 bunch of dill (about 6-8 stems)

1/2 c. apple cider vinegar

2 t salt

1 t freshly cracked pepper

5 large cloves of garlic, peeled and thickly sliced

Optional: 1-2 hot peppers. I chose not to put them in because of my daughter, but I think it really would help the flavor.

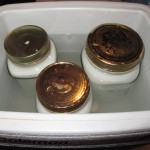
Pierce the tomatoes all the way through with a skewer and then place in a clean quart-sized Mason jar. Add the dill sprigs and pepper.

Bring 1 1/2 c. water to boil with the remaining ingredients. Pour liquid into the jars and cover the tomatoes. Stir the dill and garlic into the tomatoes. Cover and bring to room temperature. Let the tomatoes absorb the flavor overnight in the fridge.

What I would do differently: The original recipe just said to pierce the tomatoes in the stem end. This made 1/2 of the tomato taste pickled and 1/2 taste like a sour un-ripe tomato. After piercing them all the way through, I let them sit another day. I think the longer they sit, the better. These aren’t “officially” canned, so they will go bad. Don’t let them sit around too long. I also thought they could use a little more flavor, so will experiment with the hot pepper next time. I thought they were interesting and definitely a good use for what would have just gone to waste. There are also recipes for friend green cherry tomatoes (cut in 1/2, dip them in some sort of flour or corn meal and then fry), but it seemed as though the breading just wanted to slip off the smooth tomato skins.

Actually I’m really getting jazzed to learn about canning, pickling and fermenting, so I think I’ll try some different pickling techniques next time.

Why to eat grass-fed beef

I just watched the movie Food, inc., which I recommend to everyone. If you haven’t had the time to read Omnivore’s Dilemma, it condenses the information well. If you already know about most of the issues, as I did, it renews your commitment to buying the most local and naturally raised food available.

I was talking about the movie with a friend the other day and we were specifically talking about organic and bio-dynamically raised meat. I have to admit that this is something that I haven’t incorporated into my diet as much as I could/should. We usually order Bell and Evans or Murray’s chickens from our butcher, but have had some suspicions about the veracity of the being the real deal. (other butcher’s we’ve gotten them from have had Murray’s tags on the chickens and our butcher’s doesn’t) I bought an Eberly chicken, which Neil roasted on the bbq last night. It was flavorful and delicious. They come shrink-wrapped, so it’s impossible to substitute some factory-farmed chicken for one of theirs.

My friend mentioned a local bio-dynamic angus farm called Grazin’ Angus Acres. I am lucky enough that they come to my local farmer’s market every sunday. Below I put a blurb from their website that gives some information on why to eat grass-fed beef over corn-fed beef.

Ultimately it’s healthiest for you, the animals and the planet not to eat meat, but if that isn’t an option for you, switching to grass-fed is a much healthier and humane option.

Health Benefits of Eating Grass-Fed Beef:

Safety:  Because humans are omnivores, our stomachs are highly acidic. Meanwhile, the pH of grass-fed cattle is normal.  If Grass-Fed Black Angus happen to be carrying bacteria in their normal pH environment, our highly acidic stomach bath offers real protection.  Contrast that with corn-fed cattle…  Corn turns what is typically a normal pH environment into a highly acidic one.  Consequently, corn-fed cattle often require antibiotics in the feed to keep them from being sick, which generates its own set of concerns for human health.  Further, if corn-fed cattle carry bacteria (e.g. E-Coli) that is thriving in their now acidic environment, the acids in our stomachs offer little, or no, protection against it.

Omegas: Grass-fed meat has been shown to have a 60% + increase in omega-3 content, as well as a more favorable omega-6 to omega-3 ratio.  Both fatty acids are essential and must be obtained from food.  It is important to maintain a balance of omega-3 and omega-6 in our diets, as these two substances work together to promote health.  That balance is adversely affected when cattle are fed grain. Specifically, a grass-fed diet produces a 2:1 omega 6:3 ratio.  “Why should I care?” you ask…

Consider that omega-6 promotes inflammation, blood clotting, and tumor growth while omega-3 does the opposite.  Dietary experts estimate that current eating habits in America lead to an omega 6:3 ratio of about 20:1.  Grass-fed beef is a huge step in the right direction.

ProVitamin A / beta-carotene:  Beta-carotene is a fat-soluble vitamin &  antioxidant that is a safe dietary source of vitamin A.  Vitamin A is important to normal vision, bone growth, reproduction, cell division and cell differentiation.  Grass-fed beef has a 10-fold increase in beta-carotene levels vs. grain-fed.  Taking vitamin A supplements can be dangerously toxic – but, we can eat all the beta-carotene possible and the human body will only convert the amount needed to vitamin A.

Vitamin E / alpha-tocopherol:  Vitamin E is also a fat-soluble vitamin / antioxidant that protects cells from the effects of free radicals (which have been reported to contribute to cancer and cardiovascular disease development).  Grass-fed beef increases alpha-tocopherol levels three-fold vs. grain-fed beef.

Conjugated Linoleic Acid (CLA):  Numerous health benefits have been attributed to CLA including reduced carcinogenesis, atherosclerosis, onset of diabetes and body mass.  Grass-fed cattle have been shown to produce 2 to 3 times more CLA than grain-fed cattle.

IT’S NATURAL! Nature had it right all along.  The sun’s energy grows the grass that is harvested by the cattle that are harvested by us.  Grass-fed is how it was meant to be; it’s how our human construct was prepared to capture the nutritional value of meat.  The industrial machine – feeding cattle corn in confined areas – has destroyed what nature intended.

Begin to enjoy the benefits of local Grass-Fed Black Angus today!

Homemade Ravioli

Back in July, my husband gave me a KitchenAid stand mixer for our 10th anniversary. I know most people get one of these when they first get married, but back then I couldn’t imagine having such a huge appliance in my tiny Brooklyn kitchen.

I really love baking, so I’ve been having fun kneading bread dough and mixing batter for cupcakes. We decided to get a pasta rolling/cutting attachment, which has turned out to be a lot of fun. There is something so satisfying about feeding dough into a machine and having flattened sheets come out. Then you feed the sheets in and long strings drip out. I pretend I’m very sophisticated making pasta, but the reality is that I’m just playing with the grown-up version of a playdoh extruder.

Although I’ve been really swamped with work for the past 2 weeks getting ready for a photo shoot, I decided that I absolutely had to make ravioli. We had some extra ground beef/ground turkey mix from dinner, so I flipped through my book The Complete Book of Pasta and Noodles for a recipe. I chose to make meat and ricotta with basil filling.

meat-ravioli

Meat and Ricotta with Basil Filling based on recipe from The Complete Book of Pasta and Noodles by The Editors of Cook’s Illustrated Magazine.

1 T olive oil (evoo)

2 minced garlic cloves

1/2 lb of ground meat. You can use different combos such as ground beef with pork. I had beef/turkey mix on hand.

1 c. ricotta

1/3 c. grated parmesan cheese

1 large egg yolk

1/2 c. minced basil leaves (I used the last basil I had growing in a pot)

1/2 t salt

freshly ground pepper

Heat the garlic in olive oil until fragrant. Add the meat and cook on med-high until the meat browns and the liquid evaporates. Break up the pieces as it cooks. Drain off the fat and let cool a bit.

In a medium mixing bowl, add the cooled meat and the rest of the ingredients. You can keep the mixture in the fridge overnight if you like.

I made a basic pasta dough of 3 large eggs mixed into 2 cups of flour. I always try and sneak some whole wheat flour into my cooking. I only added about 1/4 cup because I didn’t want the dough to get too heavy. You can  mix your dough in a food processor, by hand, or with the dough hook of your stand mixer. If the dough looks crumbly, add water 1 T at a time until it comes together. You don’t want to add too much in case it gets sticky. I made the dough before the filling because it needs to rest for about 1/2 hour before you start rolling it out.

Now comes the fun part. When the dough is ready, you roll it out in thin sheets. Drop teaspoonfuls of the filling about an 1-1 1/4″ apart on the dough, fold over and seal. It took me a couple of tries to get my technique down. At first I was getting a lot of air trapped in with the filling, but then figured out how to press it out before I completely sealed the raviolis. I trimmed them into squares using a pizza wheel. I’m pretty darn happy with how they turned out. I’m going to experiment with different fillings, because really, how can anything surrounded by dough be anything but tasty and satisfying?

meat-ravioli2

meat-ravioli-3

Happy Halloween

pumpkin-small

I hope everybody has a wonderful and creepy Halloween!

I had snack duty today for Lindsay’s class. I couldn’t help myself….those are glow-in-the-dark pirate rings.

cupcakes-small

The cupcake recipe is from Magnolia Cupcakes. You can get the recipe at that link. It’s my go-to cupcake recipe these days. It calls for 2 sticks of butter for 24 cupcakes, but I think that can be reduced a bit. I’m going to try 1 3/4 sticks next time and then go down 1/4 stick each subsequent time I make them.

I got a 2-layer cupcake pod that carries 24 cupcakes. It looks a bit ridiculous, but it’s going to be indispensable for the next 10 years of birthday and school parties.

cupcakes2small

Much needed rain

oatmeal-cookieWe’re getting rain after about a month of dry weather. I’m happy about it because I planted some seeds (lettuce, spinach, kale and *gasp* grass seed) and I don’t really like to water the garden. It’s getting cold here, so I have to cut down the basil and make batches of pesto to freeze. I can’t remember what temperature kills basil, but it’s somewhere above freezing. We’re down to the 40s at night, so it’s cutting it close.

I bought some organic garlic and am going to plant some this fall. I’ve never planted garlic before, so don’t know whether to believe or ignore the hype about buying seed garlic. I’m choosing to ignore the hype and just got plain old regular organic garlic. I think I need to wait a little longer to plant it, so it’s in the fridge right now. I’ll probably put it in after I chop down and prune my plants. Goodbye tomatoes. How I loved you!

I also saved some tomato seeds from my plants. I didn’t really research the proper way to do that. I just put a bunch of seeds on a paper towel to absorb the pulp. Now they are a part of the paper towel, so I’m not sure if I should pry them off, or just cut up the paper towel and plant it along with the seeds in the spring.

With the cooler weather has come more baking and knitting. I just made nutty oatmeal cookies from Mark Bittman’s book Food Matters. I didn’t use the vegan options and used butter and eggs. The book is interesting (think Omnivore’s Dilemma lite) and offers weekly menus and recipes. I seem incapable of menu planning, so I’ve decided to try some of his menus. The book emphasizes healthy, mostly plant-based dishes, so I wasn’t sure if the cookies would be good or taste like particle board. I was pleasantly surprised. They had chopped up dried apples in them instead of the usual raisins that my family doesn’t like.

As for the knitting, I am making a raglan sweater for Neil from wool I spun ages ago. I’m crossing my fingers that I have enough wool to finish it. This weekend we are joining our friends for a weekend in Woodstock, NY and a visit to the NY Sheep and Wool festival on Saturday.

How to make yogurt

I’ve been reading my daughter the Little House on the Prairie books lately. What amazes me when I’m reading them is how many different skills people had back then. They raised animals, they built houses out of trees, they gathered honey from hollow trees, they made cheese, soap, maple syrup, beds, clothes, you name it. It seemed as though there was almost nothing they couldn’t do to meet their needs. It seems now that there is almost nothing we can do to meet our needs. Okay, computers, heat, cars and all of that are fantastic inventions, but we’ve become so specialized that things that a child could do during Laura Ingalls’ time seem exotic to us now.

Take cheese making for instance. How many people know how to make their own cheese? Maybe there isn’t enough incentive now that wonderful, artesian cheeses are available in every decent-sized town. We have a great cheese shop in our neighborhood called Stinky. But I digress.

Almost a year ago I started to read up on making cheese. I found the New England Cheese Making Supply Company online and promptly ordered a cheese making kit. They teach you how to make fresh mozzarella in 30 minutes. I tried it and it was delicious. I decided to try yogurt and discovered this site. He errs on the side of caution with heating the milk up, but I decided I would try his method and then I could always scale things back when I was more comfortable with the process.

So let’s make yogurt!
You will need:
1 gallon of milk
1 8oz. container of yogurt that’s unopened
powdered milk (optional)
a big stock pot
enough jars (mason, spaghetti sauce) to hold the gallon + of milk
cooler

• First you want to steam the jars you will be using for about 10 minutes to sterilize them.
• Add a gallon of milk (not ultra pasteurized!) to a big stock pot (with a heavy bottom). You can make your yogurt full fat or lowfat by choosing what kind of milk you use. You can add 4 T of powdered milk to make a thicker yogurt.
• Heat the milk slowly until it reaches about 185-195ºF.
• Place the covered pot in a pan of cold water to cool it down. Again, some people skip these first steps, but this kills any pathogenic (euw!) bacteria that may be hanging around.
• When the milk cools to 122-130ºF, remove it from the cold water bath. Pour 1 cup of the milk into a 2-cup measure.
• Add 1 cup of fresh yogurt until mixture is well-blended.
• Slowly add your yogurt/milk mixture into the rest of the milk and mix well.
• Pour milk mixture into the sterilized jars and cover immediately. One of your jars can be an 8oz. jar that will serve as the fresh yogurt for your next batch.
• Add water that is about 122-130ºF to the cooler. Set the jars in the cooler. The water should be below the level of the lids. Let the jars sit undisturbed for at least 3 hours. If you don’t have a cooler, you can wrap the jars in towels and keep in a warm spot.

Your unopened jars will keep for up to 2 months in the fridge, so you have plenty of time to enjoy this delicious yogurt.