Making Vanilla Extract

vanilla extract-2

I’m not sure exactly how making vanilla extract came on my radar. It probably came from buying some at the store and experiencing sticker shock. I do a lot of baking, so I go through it pretty quickly.

I poked around the internet for recipes and mostly found ones on sites that sold vanilla beans. I suspected that the amount of beans they called for was pretty high because they had a product to sell. I am able to buy vanilla beans at my wonderful import shop Sahadi’s.

I decided to begin with a small (200ml) bottle of Tito’s vodka and 3 vanilla beans, cut in half lengthwise and again widthwise. I started that on 8/4 and put it in a dark cupboard to steep. After a month and a half I realized that I had been too cheap with the vanilla beans and bought 3 more. I cut them up the same as before.

It’s now 2 months later and the scent of the vanilla extract is heavenly. You can get into which type of vanilla beans you want to try. For now, here’s a basic recipe.

1 small bottle (200ml) of vodka

6 vanilla beans cut lengthwise and widthwise.

Drop the beans in the vodka and let sit in a dark cupboard for 2 months. Re-bottle into small cute bottles and share with your friends. Or horde it yourself and share your baked goods.

vanilla extract-1

How to Make Felted Acorns

felt acorn-1The next time you are taking a walk in the woods, and the ground isn’t covered in snow, you might want to gather some acorn caps to make felted acorns. It’s a quick and simple project and looks nice on a little dish, or tied to a present, or even as an ornament. I thought they would be fun to make into a garland, but haven’t engineered that just yet.

To make the felted balls, you will need either wool roving or a rustic-style of yarn. The more processed the fiber, the less likely it is that it will felt. Think itchy wool, and you’re halfway there.

You will need a bowl of warm, soapy water. I used dish soap. Make a loose ball of yarn or roving about the size of a peach pit and dip it into the water. Squeeze the excess water out and start to roll the ball between your palms in a circular motion. Keep going until you can see that the ball is beginning to felt, which should happen in just a minute or two. Roll the ball until it is the perfect size to fit in your acorn cap.

Wait for the balls to dry and then glue into the cap with a little fabric or craft glue.

Fabric Gift Bags

fabric bags-1Every year on Christmas I have a mini freak-out. It usually passes without notice, but this year I’ve decided to pre-empt it. The freak-out is about the big recycling bag filled with wrapping paper.  We usually wrap our gifts the night before, so this colorful paper is only “in use” for a few hours. I’ll spare you my rantings on the subject.

fabric bags-4Anyhow, this year I decided to do something about it. Inspired by my new serger sewing machine, I have been making fabric gift bags. It’s been a lot of fun to use fabric scraps that have been sitting in a box for ages. So much fun that I even ordered some holiday-themed fabric. As I see it, we will be able to use these bags for years and alleviate the need for wrapping paper. I have been plugging away at them and searching the web for different tutorials. Rather than make my own tutorial, here are some links to good ones that I used:

Drawstring bag by Kitty Baby Love. I used their instructions to make the larger muslin bag in the photo above. This bag has french seams and drawstrings on both sides of the bag.

Fabric Gift Bag by Positively Splendid. I used their instructions for the bag shown below. It has a drawstring on just one side, which is nice if you are running low on ribbon.fabric bags-2

I made the bag below with instructions from the book Ready Set Serge.fabric bags-3

Making drawstring bags uses a heck of a lot of ribbon, which can get pricey. When I ran out of ribbon, I wanted to keep going instead of having to shop for more. What do they say about necessity being the mother of invention? I decided to take out my bias tape-making gadget and turn 1″ strips of fabric into bias tape. Then I chose fun stitches and thread to sew the seams closed.

fabric bags-7fabric bags-8fabric bags-6fabric bags-5

And what comes after all these drawstring bags you ask? How about a bunch of these cute zippered bags? So perfect for storing my knitting notions!fabric bags-9

How to make Violet Syrup

violet syrup-3

When the violets are out and blooming, make sure to gather some for your kitchen. These edible flowers can be used in many ways. You can sprinkle them in salads to add a splash of color, you can freeze them in ice cubes to put in fancy drinks, you can crystallize them (although I have never done that), and you can make violet syrup.

violet syrup-2

I looked at various recipes for violet syrup and they were all various combinations of violets, water and sugar. I decided to wing it a bit and the results came out well.

First, gather as many violets as you can. It seems as though the flowers will be their sweetest before they are in full sun. So early day or early evening works best. You can use your hand like a rake to catch the flowers between your fingers. This makes it quicker. Recruiting small children works well. My daughter loved picking flowers with me.

Rinse off the flowers and pluck off the stems. I wasn’t clear whether I needed to remove the green bit on the end of the flower as well. The first batch (photo below) I went crazy OCD and removed them. My second batch, I didn’t. I couldn’t tell any difference, so save yourself a lot of work and leave the green ends on.

violet syrup-4

My recipe based on how many flowers I gathered..

  • 1/2 quart of violet flowers in a heat-proof jar with lid
  • Add 1 1/2 cups boiling water. Let this sit 24 hours.
  • Strain the violets out of the water and press as much liquid as you can from them.
  • Combine 3 cups of sugar to the liquid and heat in a pan until the sugar dissolves.
  • Stand back and look at the gorgeous liquid and start planning how you are going to use it.

violet syrup-5

violet syrup-1

We tried it in cocktails, but I thought the subtle violet flavor was lost and only tasted the sugar. We have made soda by adding some seltzer. It is like the European fruit syrups used to flavor fizzy water. And we have poured it over waffles. It’s really lovely.

Interestingly enough, violets were used as a kind of litmus paper. If you add an acid like lemon juice, the liquid will change to a magenta color. I believe it turns green with a base, although I’ve not tried that.

Making Butter

Making Butter from Martha Lazar on Vimeo.

On one of Lindsay’s school field trips, they visited The Old Stone House, which was an old Dutch farmhouse here in Brooklyn. On that trip they made butter and Lindsay has mentioned from time to time that she’s wanted to make some at home. You probably know by now that this request warms my little pioneer heart.

She recently brought it up again, so while Neil was out shopping, he picked up some heavy cream for her. We placed it in a large mason jar and started shaking it. And shaking it. I think it’s funny how she can look so badass while churning butter.

Eventually (and not before she lost interest and hopped in the bath), the cream separated into butter and buttermilk. We washed the  butter in cold water and Lindsay formed it into one of her bowls.


Making Sauerkraut

In this post, I showed how to make sauerkraut. I used a plain old ball jar to let the veggies ferment. I found this technique to be problematic, because it was difficult to weigh down the veggies.

When fermenting veggies, you really need to keep them below the surface of the brine. If they aren’t below, mold grows on them. Now, this isn’t uncommon, and many people routinely scoop the “scum” off the top. That just made me squeamish. It’s really funny, because if you ask most of my friends, I have a very high “skeeve” threshold.

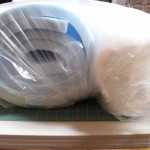
I wanted to get a crock that was made specifically for fermenting and pickling. In comes the Harsch Crock. This guy is expensive, but it’s the kind of thing you buy once. It comes with weights that sit on top of the veggies to keep them submerged in the brine. It also has a channel in the lid that you fill with water, which allows gases to escape the crock, but doesn’t allow air or debris in.

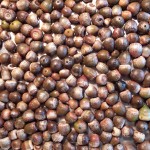
I looked online at all the tiny photos like this one and ordered one. I was very surprised with how huge the crock was when it arrived. Does anyone else have this problem? Tiny photos, nothing next to it to show scale…? Okay, I know it said 5 liter capacity…

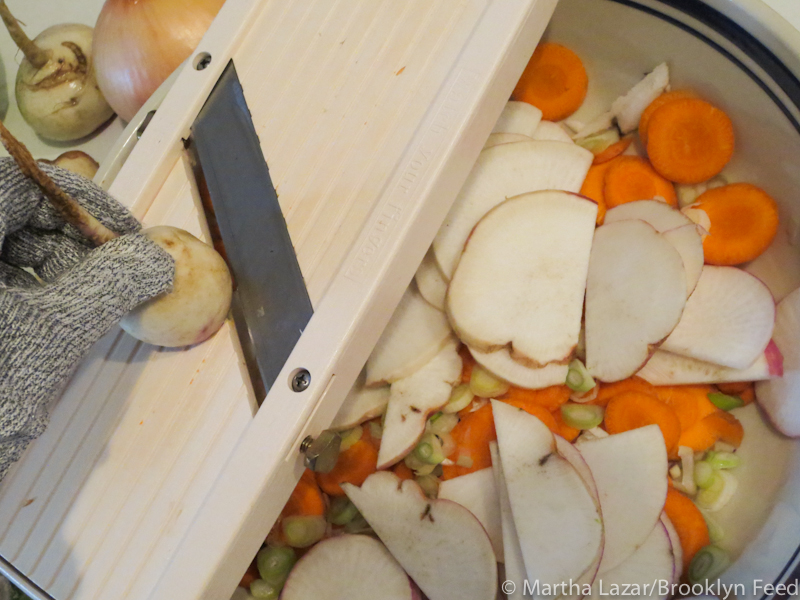
So, it’s been sitting around waiting for me to want to make an enormous batch of sauerkraut or pickles. I also got a mandoline to help with slicing all the cabbage.

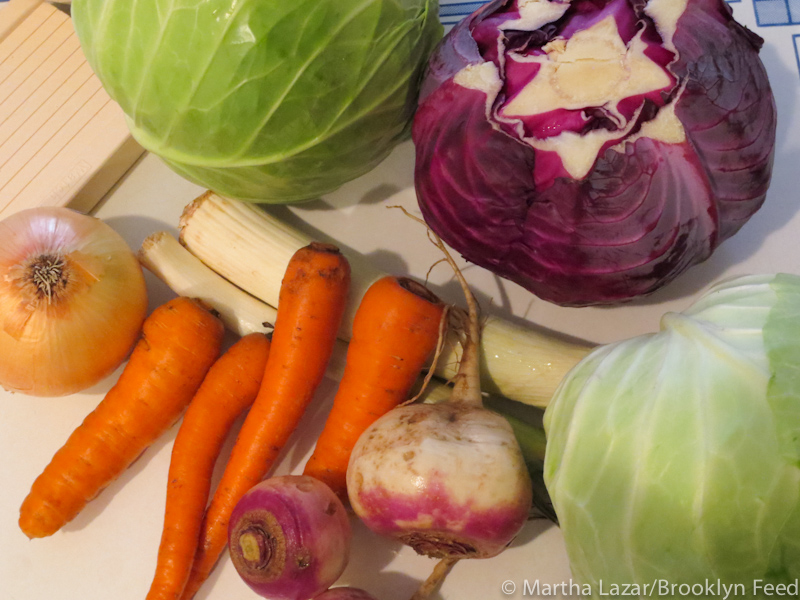
My Very Loose Recipe for a 5 liter crock (you can also use just cabbage, or add other veggies like radishes, garlic, bok choy):

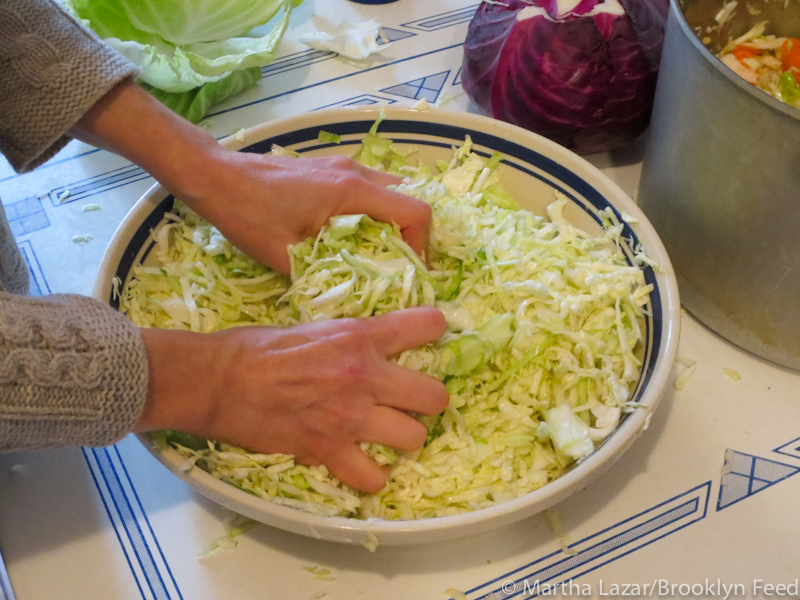
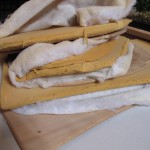
  • 3 heads of cabbage. I show a head of red cabbage below, but decided to stick with just green cabbage. You can certainly use red, but your sauerkraut will turn out pink.
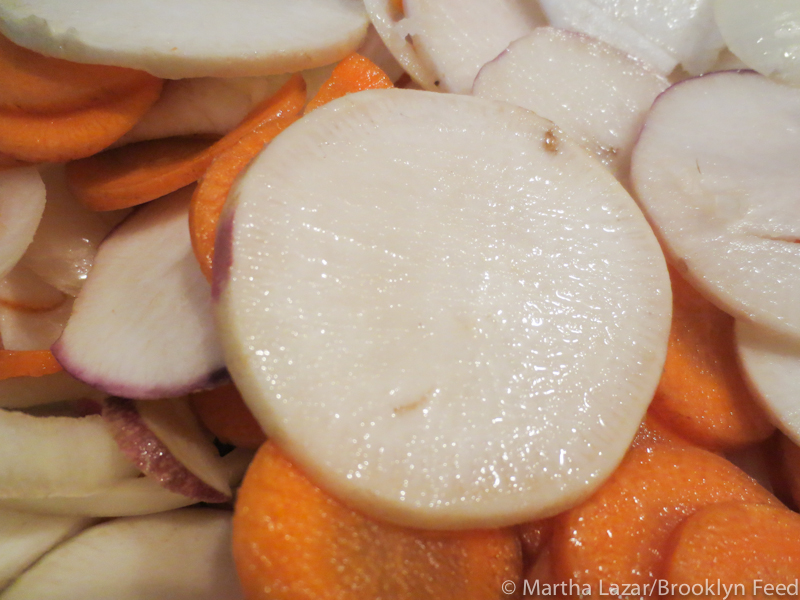
  • 4-5 large carrots
  • 4-5 turnips
  • 1 large onion
  • 2 leeks (white part)
  • appx. 9 T salt

After slicing all the veggies, you need to add salt and knead until the vegetables release the water from their cell walls. I add about 3 T of salt per large pasta bowl. I filled this bowl three times.

After you have done this, you should take handfuls of the veggies and press them firmly into the crock. I use my fist to tamp them down. Add all the water released and press the veggies under the water level. If you don’t have enough liquid, you can add 2 cups of water with 1 t. of salt dissolved in it. I save a few whole leaves of cabbage to place on top of all the chopped ones. This helps hold the loose pieces down.

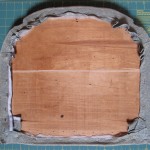
Then put a plate, rock, ziploc filled with salt water, or the weight from the crock on top of the cabbage leaves to keep everything submerged. You let this sit out for a few weeks to ferment. Taste it periodically to test how fermented you like it. Too fermented gets mushy.

I made this batch about a week ago and the crock is sitting in a corner of my kitchen. I kept hearing little blerps and couldn’t figure out what the source of the noise was. It turns out it was bubbles emitting from the sauerkraut crock. Euw. As I mentioned in my previous sauerkraut post, you have to get over the fact that the food is basically rotting away. That is part of the process and it produces a delicious food that is extremely healthy.
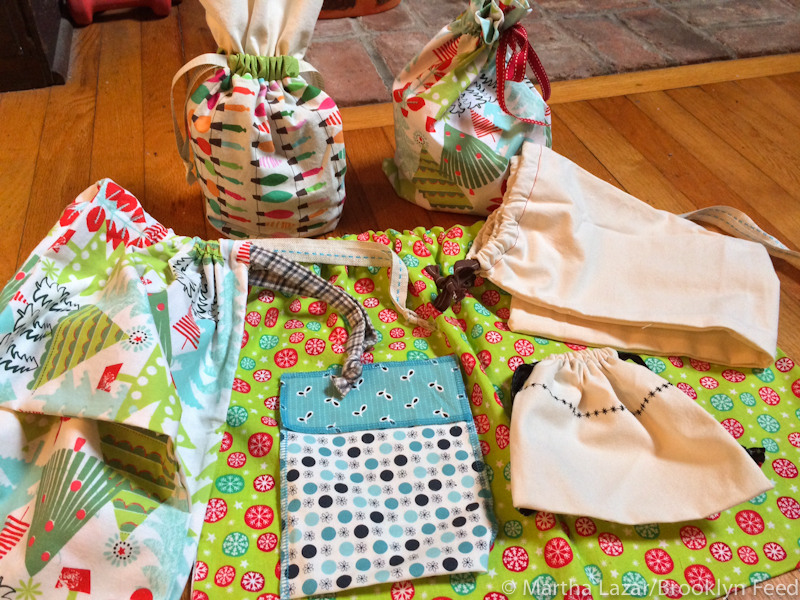
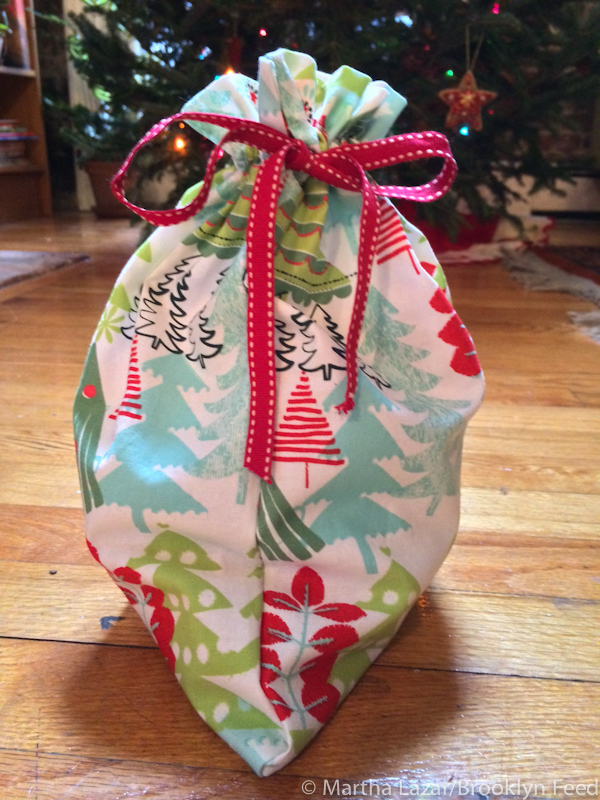
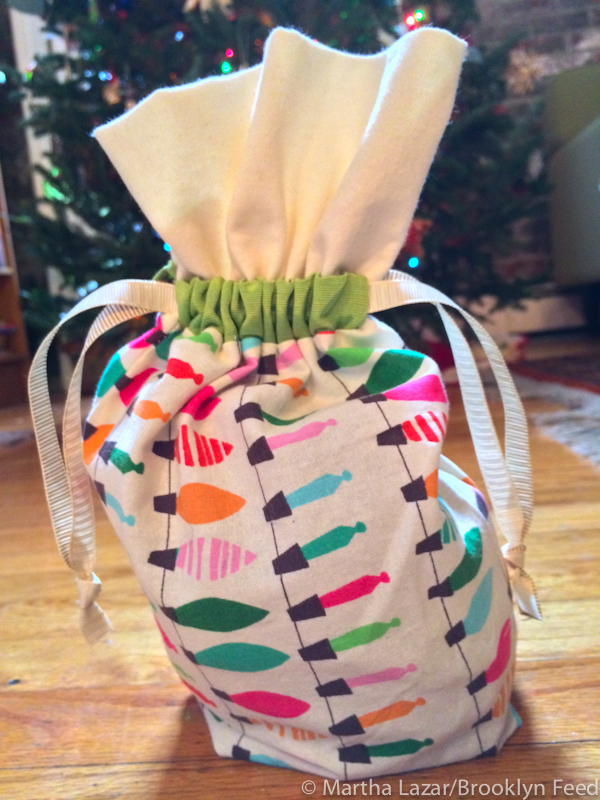
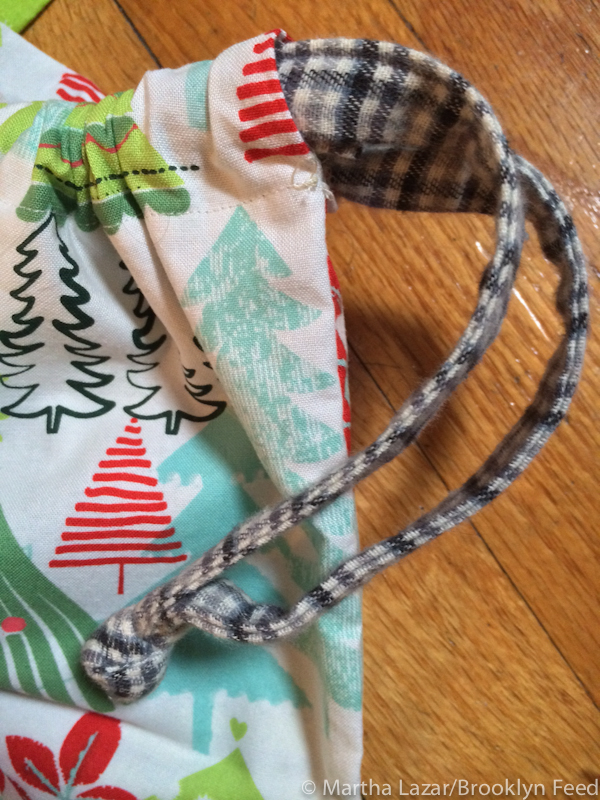
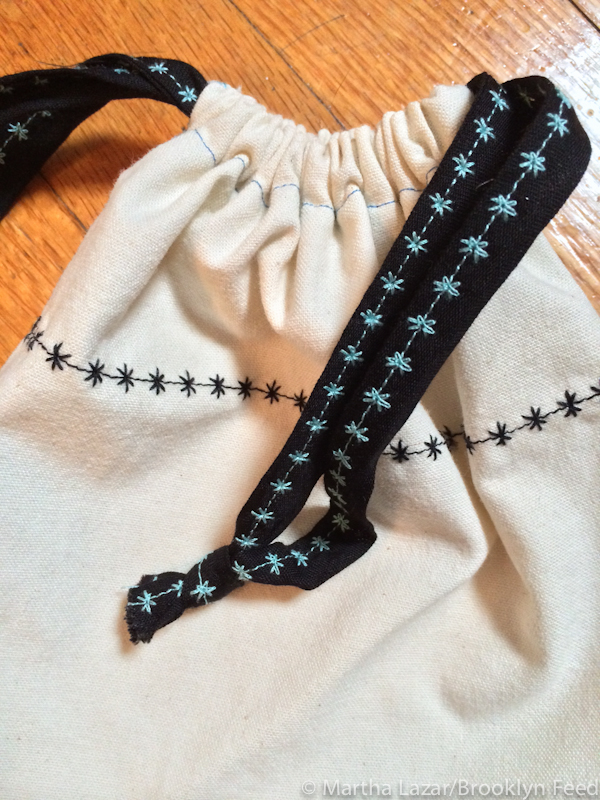
Pea Shoots


With my garden still a distant dream, I have been really craving ways to grow some fresh greens. This winter I discovered fresh pea shoots through my winter farm share. They were so amazingly fresh and tasty and somehow my body craved them without ever knowing about them. Hmm..that makes sense to me but probably nobody else. Do you ever have strong cravings for certain foods and just know that your body is telling you it needs more iron, or more fresh veggies? It felt as though after the first bite of these sprouts my body heaved a big sigh. And then I couldn’t shovel them into my mouth fast enough. I felt like Rapunzel’s mom when she was pregnant and craving the witch’s rapunzel.

Anyhoo, when I was ordering seeds for my garden, I saw sprouting seeds and ordered fresh peas. I started these guys 2 days ago and already they have the tell-tale tails (oh dear, maybe this isn’t the morning to try and write a cohesive post) that show they are sprouting. It’s taking all I have not to stand next to them and yell at them to sprout faster. I’ve never grown them before and have no idea how long they take. I’m trying to be patient as I tie a napkin around my neck.

How to make acorn flour

When you are interested in foraging, you really have to pay attention to the seasons. If you read about ramps in the winter, you are going to have to wait until spring to find them. Shopping at grocery stores seems to have made us forget that certain things grow at certain times of year. At least locally, that is. I had read about making acorn flour a while ago, but it wasn’t acorn season. I forgot all about it until I saw Stephanie mention it in her blog. I was going up to the Berkshires for the weekend and it was the right time of year for acorns.

We went on a hike and I brought a backpack along to gather nuts. I had no idea how many I would need, so I summoned my inner squirrel and kept gathering and filling my bag. When we got home, I weighed the nuts I had found and had 8lbs. After pulling off the tops and discarding the ones that had worm holes in them I had 6lbs. I read in a couple of places that you place the acorns in water and the ones that float aren’t viable. I tried that and almost all of mine floated. I decided to check inside and see what they looked like. Some were bad, but most were good, so I decided to skip that theory.

Now comes the gross part…grubs! Many of the acorns had grubs. The fat, white, wiggly things totally grossed me out, so I decided to bake the acorns at 170 degrees F to kill them. A dead grub is still gross, but a wiggling one is much worse.

After discarding the acorns that were discolored or had grubs in them I think I was down to about 2-3 lbs. Acorns are full of tannins, so you have to soak them for several days to remove the bitterness. I tried soaking them when they were chopped, but thought that the water wasn’t getting to the inside of the acorn meat. I ran them through a meat grinder to chop them smaller.

Directions for how to make acorn flour:

  • Gather a ridiculous amount of acorns
  • Discard any that have obvious problems (squirrel bites or worm holes)
  • Bake acorns at 170F for 1 hour to kill grubs
  • Shell acorns tossing out any that are discolored or have grubs. It is pretty obvious which ones are good and which ones aren’t
  • Grind acorns in a food processor, or a meat grinder
  • Wrap in several layers of cheesecloth and soak in water. You will need to do this for several days, until the meat isn’t bitter.
  • Lay the acorn flour on a pan and either dry in the sun, or in the oven on the lowest setting. Make sure it’s completely dry or it will mold.

I will post some recipes within the next few days.

How to re-upholster a chair

For several months we have been living with chairs that looked pretty shabby. The fabric covering started to tear on several of them. This weekend we finished re-covering them, which was a simple process.

One of the enormous benefits of living in New York City is the ability to find almost anything. I needed upholstery fabric, foam and dacron. I got the fabric at Mood fabrics (famous for supplying the show Project Runway) and I got the foam and dacron at Canal Rubber. Dacron is a stretchy, web-like material that covers over the foam. If you are at all like me and are not on top of *everything*, you might have chairs that go neglected. What happens under the fabric is that the foam turns a gross shade of orange and becomes brittle and powdery. The dacron stretches over the foam and keeps this powder from dusting the floor under the chair. Have I shared too much??

Anyhow, the internet is rich with videos on how to re-upholster a chair. Each version is slightly different. Glueing the foam to the seat didn’t seem right to us, so we stretched the dacron over it and stapled it down. It’s mostly just common sense.

Neil unscrewed the seat of the chair from the wooden frame. There were 4 screws on the bottom of the seat. He then took a flat head screwdriver and removed all of the staples holding the fabric and foam onto the seat. The seat is just a sheet of plywood.

I traced the plywood shape onto the foam, giving an extra 1/2″ of space all around. I cut the foam with an electric turkey carver. Now I feel I have to explain something…we don’t use this carver to cut turkey. We bought it when we made a foam turtle shell for our daughter’s Halloween costume years ago. The man at Canal Rubber suggested using a box cutter to cut the foam, but if you can get your hands on one of these electric carvers, your life will be much easier.

I cut the dacron with a pair of sharp scissors to a size about an inch or 2 larger than the foam. We placed the foam on the plywood base and stretched the dacron over it. Then we used short staples and a staple gun to attach it to the wood.

I traced the shape of the old fabric onto the new fabric. The foam we used was slightly puffier than the old foam, so I needed to add about an inch and a half all around. You can use scissors. I used a rotary cutter. Then you stretch the fabric over the dacron and staple it down. I found this much easier with two people, but you could do it solo. We also did the canvas stretching technique, which is when you start stapling the fabric in the middle of one side, then flip it around and staple the middle of the opposite side. You do this on all sides and work your way to the corners.

I should have taken more photos, but I think it is really common sense. When you get to the corners, fiddle with how you fold the fabric so it looks nice.

Wild Fermentation Workshop

I just signed up for a fermentation workshop with Sandor Katz. The June 8th workshop is being put together by Just Food here in NYC. Sandor Katz will talk about the health benefits of live-culture ferments and will also show how to make sauerkraut, kimchi, pickles, etc. I tried making pickled green tomatoes last year, so I look forward to learning about more options. I’m also a big fan of kimchi, so it will be nice to be able to make it myself.

I’m meeting my friend Victoria there and hope to see some other familiar faces. The admission is $30 or pay $45 and they’ll throw in a copy of Sandor’s book Wild Fermentation. Here’s a link for more information. You can buy tickets online.